Tomorrow I'm going to get a new diff and half shafts. The ones we bought first time round had the wrong size hub bearing. Pity about the cash but I think its the right decision. We will now be able to move forward quite a bit. Besides not having shocks we should have a rolling chassis by the end of the weekend. Pics to follow (My SWMBO has the camera)
I'm really excited about the project at the moment hopefully we will get alot done this weekend.
Friday, 16 November 2007
Monday, 12 November 2007
I'm still alive
This weekend I finally got back to working on the car. I have now put it the steering column, extended bottom link and rack. I've also done the front suspension.


Its starting to come together at the front at last


Our pimping steering wheel that cost a cool R200


There was quite alot of work involved getting the front wishbones backed out properly with washers, oh and before anyone freaks out the nuts we are using are temporary we will change them for nylock nuts as soon as we are happy with everything.


Its starting to come together at the front at last


Our pimping steering wheel that cost a cool R200


At last we have an oil pickup, this one came from Toyota and cost a small fortune but I was fed up with trying to find one. So now the sump can go back on.


Monday, 08 October 2007
More Panels
The weekend was very busy so not alot got done but we did some good work tonight.


Both side panels are now finished. The front bulkhead panel is also fitted but not yet held by riv nuts.


I put the tunnel and rear panels in and after some encouragement by Andre (he thinks it will be easy enough to put the wiring loom in after the panels are on) I think they will be the next ones to be riveted.
Still waiting for the correct rear uprights and the wiring loom.
Thursday, 04 October 2007
Lots of progress :)
Alot of rivets put in tonight and amazingly I don't feel too sore. I do have metal shavings inside my top from drilling under the car, bloody ichy.


I'm not looking forward to the other side, its such a mission to get it fitting nicely. Maybe it will be easier second time round.


I'm not looking forward to the other side, its such a mission to get it fitting nicely. Maybe it will be easier second time round.
Wednesday, 03 October 2007
Who says sidies are out of fashion
Getting ready to rivet on the side panels, unfortunately I have to skip the transmission and rear bulkhead panels for now since I do not have the wiring loom yet. Both sides have a good fit with very little alteration needed.


Tuesday, 02 October 2007
Upsidedown and rivet it insideout!
I forgot to mention that a friend from work lent us some bantam wheels. I kinda like them, only trouble is they are 185 and 14" and I wanted 195/15" but beggars can't be choosers and at least we have something to get the rolling chassis going.


Tonight's work,
The before:


the fuel inlet pipe has already been done but I was worried about the floor panel when it came to the return pipe. So we flipped the car over and I had a bash at drilling and riveting the floor and return pipe (Dad was helping my brother move house, I got away with just carrying the bed).
After:


I hope its not too serious that the pipe runs slightly bellow the chassis, I can't imagine it could be as long as the middle of the car doesn't get wedged on something


TooBusyToBuild
You may be able to tell from the long absence that things are going quite slowly. I did do some good work on the steering and more on the fuel lines. Hopefully we can put them to bed by the end of the week and get started on some ali panels.
Monday, 10 September 2007
Fuel lines
We have acquired fuel lines and also the various bits to connect them to the engine. Also got Riv nuts and a riv nut tool that cost us R400 but at least we can do a proper job now.
Then on Saturday the old man managed to find an alternator for R200 although the mounting bracket is wrong, still to go is the oil pickup, dizzy and about a million rubber pipes for the vacuum sensors and cooling system.
I still get very scared when I think of all that needs to be done and how little I know about any of it. So far we have managed, so the aim of the game is slow but steady!
Friday, 07 September 2007
Prop Shafts
Here are the two types of Sierra Prop shaft. (A) being the correct one and (B) being the one I got from the scrappy. (B) is unsuitable because it has the rubber doughnut attached to the spline part, which is too wide to fit in the transmission tunnel.


There are a number of different ways to shorten the prop but we have chosen to remove the centre bearing and just have a UJ at each end.
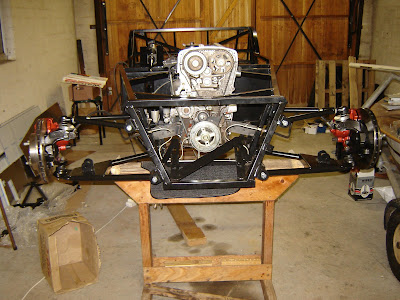
This is what we are aiming for
Then in other news we trial fitted the front suspension for a bit of fun.

Then in other news we trial fitted the front suspension for a bit of fun.

Front brake lines done.


Tuesday, 28 August 2007
Engine in
Lots of fun was had putting the engine in since we had a chain hoist but nothing to fasten it to. We happened to have a nice piece of 2m long square tubing which was 750mm x 750mm. So our great plan was to slide it between two of the joists to create a place to hang the chain hoist. Come to think of it I should have taken a picture to explain better.
To cut a long story short we sweated atop stepladders for a good 45 minutes to get it right.
Next mission was that the engine was on the other side of the garage from the front of the car. I don’t know how much the engine actually weighs but I was surprised to find that a 56 year old man and I could pick the whole thing up and move it into position.

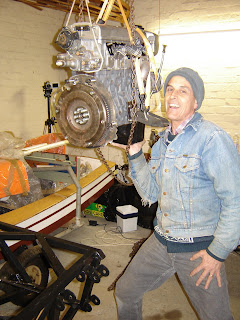
A guest appearance by my mom

The engine Finally in, we had to fasten the gearbox mid way but since Brad made such nice engine mounts it made the whole exercise rather easy.

We found that the sump was only fastened on with about half the bolts it should have been and since it was dented we decided to take it off to get it repaired, upon doing so we found that the oil pickup was missing.

Now that we have the engine in temporarily we can look at routing the front brake pipes and fuel lines.
On Saturday I got a prop shaft, handbrake cable and steering rack mounts. I have no clue as what to do with the prop shaft I just know its got to get shorter by quite a lot.
Thursday, 23 August 2007


Monday, 20 August 2007
N/S internal transmission tunnel panel (drilled)
I nearly forgot we also drilled the other footwell panel
but have not fitted it yet. We decided to wait a bit incase
we need access to something there later on.
Gerrie thank you for your comment
and any other comments are welcome.
Ah another thing the video is coming along nicely but I
thought I would wait for more progress before updating it.
but have not fitted it yet. We decided to wait a bit incase
we need access to something there later on.
Gerrie thank you for your comment
and any other comments are welcome.
Ah another thing the video is coming along nicely but I
thought I would wait for more progress before updating it.
No pictures I'm a dummy I know!
So on the weekend we picked up all our nuts, bolts and washers
and then proceeded to get nothing else done because of a
lovely drive in the countryside with some friends.
But on Sunday after church/lunch we got to work on the pedal box.
We finished it by late afternoon and then it was time to start bending
brake pipes, at which point my dad chickened out.
We did find that there was a mismatch in thread sizes
of the rear MC and its brake pipe fitting. So the pipe
and the MC are at Brake Super Service today to sort that out.
Tuesday, 14 August 2007
1) Fit front O/S internal transmission tunnel panel
We shaved a bit off the panel here and there (for the perfect fit)
and also bent the flange 180 degrees because we had two N/S panels.


Siliconed, riveted and clamped!
and also bent the flange 180 degrees because we had two N/S panels.


Siliconed, riveted and clamped!
Monday, 13 August 2007
Sunday, 12 August 2007
Ahh there's a hole in my chassis
This weekend we tried to do a lot but ended up with less progress
then we had hoped. At least we have officially started.
We have riveted the driver side floor panel on
and all the calipers have had their second coat of red hammerite.

The old man making a few adjustments
We are getting a quote for all the bolts that are needed
from a local guy Fastfix (local is lekker).
He also happens to do upholstery
so it looks like we have our seats sorted.
A visit to the Auto spares place only ended up yielding
a new pop riveter and brake kits for the front,
oh and some rubber bushes for the steering rack
but the front ball joints have managed to elude us.
Let’s hope things will rev up next week with the
pedal box and a whole lot of bolts.
With the beginning of the build came the first video recording.
The plan is to make an archive of all the stuff we assemble on the car
and then compile it at the end of the build to a 10min build video.
Should look good or maybe I’ll make episodes as we go along.
Friday, 10 August 2007
9th Aug - Womans Day (Some extra time to get stuff done)
We now have some brake lines and rear callipers
and since we have all the calipers I felt it was time to paint them.
So I whipped out the red hammerite and got stroking.
They already look good with just one coat.


We also did all the polybushes and steel sleeves, all looking good.

and since we have all the calipers I felt it was time to paint them.
So I whipped out the red hammerite and got stroking.
They already look good with just one coat.


We also did all the polybushes and steel sleeves, all looking good.

Tuesday, 07 August 2007
All time classic
Well it is my proud honour to present the classic build photo
with the bare chassis sitting on trestles of some kind.

I stacked all the bodywork in my special storage area
(to most people it may just look like a boat).
Then I did something silly, I thought of all the stuff that needs to be done,
this scared the pants off me so I thought it best to go to bed.

The lady friend helped me to try and mix red and gold
hammerite to make orange. This turned out rather badly,
in fact it just doesn't look orange because the gold is not yellow enough.
So we will just go with redish calipers with a hint of gold.
I'm busy working on getting the Locost bearing carriers to fit my drive shafts,
it's turning out to be a bit messy because my bearings are the smaller of the two
types and the locost ones are of the bigger size. so either I must get a special bearing
or I have to send them back to JHB to get the right size.


Subscribe to:
Posts (Atom)